Home

Showing posts with label #handmadecard. Show all posts

Thursday, February 18, 2016

Stamppin Friends Black, White & Whatever You Like


Welcome to Stampin Friends Black, White And Whatever You Like Blog Hop!
I hope everyone enjoyed their Valentines Day! 

We have a line up of super talented designers and I'm sure you will be wowed!
If you just arrived from Kim's Blog thank you for continuing with the hop!
If you missed her blog click the Previous button to check out her amazing creations.


We are excited to have three Awesome Guest Hoppers this month that you should definitely check out!
Cindy Slack Waldroff
 Barbara Welch
 Angela Carter


Ready to win 15 prizes?!! Just enter the giveaway by commenting #SFJanhop! If you comment and include #SFFebHop on each blog it will give you 15 chances to win 15 crafty gifts. Details below!


For my card I decided I wanted to use my Catherine Pooler Stamp Of Approval Young At Heart Collection. I cut my card base using MFT Blueprint 25 and then I cut a piece of Neenah Solar White 110lb card stock using Blueprint 24. The pierced circle was also an Mft die which I left in place with low tack tape to make it easier to stamp the various circle stamps from the SOA Collection. The stamps to the bottom right and the sentiment are also from SOA. I popped the center part of the circle up with pop dots. I forgot to mention that pert was cut using the MFT stitched inside and out circle Stax. I assembled my card using a new glue PPA Matte  which doesn't show if it seeps out .


My project was pretty easy to do. I purchased some chalkboard banners and stamped them using and MFT script background stamp and white pigment ink( you need to let this dry thoroughly). While it was drying I set my Silhouette Cameo up and cut my letters. Then I applied them to the banner pieces. All that was left was to run my ribbon through and add washy tape.

I'm so glad you stopped by and hope you enjoyed my creations. I'd love to hear from you in the comments section and feel free to follow me and checkout my other post. Up next is Lynn just click the Next button to continue on the hop and see what awesome creations she has in store for you! This is not goodbye but see ya later!


  1. Lynn Streifert 
  2. Carolina Evans 
  3. Elizabeth Jeanne 
  4. Kirsteen Gill 
  5. Leanne Johnson 
  6. Steph Jandrow 
  7. Barbara Welch 
  8. Kathie Rotti 
  9. Melissa Thomas
  10. Sarah Devendorf 
  11. Andrea Tucker 
  12. Angela Carter 
  13. Cindy Waldroff  
  14. Kim Smith 
  15. Deana Benson - You Are Here!!!


Thursday, February 4, 2016

Somebunnies Luck With Laura's Loft

So happy to be hopping with Laura over at Laura's Loft today. With Easter and St. Patty's Day coming up we wanted to show you some creations with those holidays in mind.  If you arrived here from Laura's blog I know you enjoyed what she created for you. If not you can click on the previous button below and it will take you there so you can check her out!

We have an absolutely awesome guest designer this month!

     Laura is having a GIVEAWAY and the winner gets this awesome prize!! 

   The details of Laura's GIVEAWAY are at the bottom of my blog.
Let's not forget Christmas Stamps & Dies are 45% OFF and if you spend $75 get $10 off with coupon code $10off75 on Laura's Loft!

Be sure to check out the new additions we have this month in these collections:


From the moment I saw the Lovely Links Fri-Dies I wanted to make a St. Patrick's Day card with it. I know it is intended as a hearts and love theme but I saw four leaf clovers. To start this card out I chose several shades of green card stock and cut them with the dies. Then I arranged the dies on a 3 3/4 x 5 1/4 piece of white card stock and ran it through my Big Kick. I took another piece cut the same size and put a piece of Stick It on it then attached the piece of die cut white card stock lining it up so it was even. I inlaid the white link pieces and then started putting the Hearts and circles in, in various shaded of green. After I finished I ran the finished piece through my Big Kick to make sure the were in good. I used a Sentiment from CAS-UAL Fridays Clover, stamped it in Versa Mark on Vellum and heat embossed it in WOW Rich Gold. I couldn't really decide where I want it and after moving it around several times I cut it apart and adhered it between the links. I also used the same embossing powder to add the Clover on the middle circle. I added some sequins from Design Creative Bling Puttin On The Ritz mix. The last couple of things I did was Mont it on a piece of MFT Gold Shine card stock and then a piece of MFT Dill Pickle card stock.


I had this idea in my head of creating an Easter card that the egg was created by stamping floural images within an egg shape stencil. So I made me a stencil on my ScanNCut using the
plastic that Gwaltney bacon sits on in it's package. I sprayed it with adhesive and lined it up in the center of my white card base. I used Altenew's Vintage Flowers and Painted Butterflies and stamped my images using Altenew inks. after I finished this part I removed my stencil and covered my egg with the negative and began with the lightest color Altenew Blue and worked my way up to the darkest with a blending dobber blending the colors all around the edge of the egg getting lighter as i went outward. When this was done I re positioned my original stencil and used Buttercream around the edges. I placed the negative back down with the stencil and slightly offset it to blend in a shadow. I wrapped up this card by drawing my flourishes, sentiment and dash lines around the egg in white Signo Gel Pen then shadowed them with a black marker.


I first colored the Bunnies and flowers then cut them out on my ScanNCut 2. I used Mementoe's Duel Marker Pen to finish of the edges and make them standout. I used the Balloon edge from MFT Blueprints 26 to cut my hill. I trimmed the balloon tail off. I used MFT Blueprint 20 Scallop and Stitched Frame to cut the yellow frame. For the background I blended TH Tumbled Glass to make a sky then stamped the sentiment from Newtons Nook Simply Seasonal in different distress inks. I used the die from Hero Arts Happy Stamp and Cut to cut the word happy. To assemble this card I first put my frame on a piece of acetate. Then began gluing down the rest of my scene. When I was done I flipped it over and added my foam tape. I used Design Creative Bling Raspberry Crush Sequin mix. The last thing I did to finish it up was put the back on and pressed firmly around the edges.


I used MFT Blueprint 3 & 20 plus MFT's Peek a Boo Window to cut my pieces. When I layed them out I decided the solid light green needed breaking up so I laid a stencil over it and sponged some green ink over it. I took a piece of Neenah Solar White card stock and stamped the shamrock from Newtons Nook Simply Seasonal in various green inks. I used Hero Arts Happy Stamp And Cut Happy Die and cut a piece of black card stock. St. Patrick's Day is stamped in Versa Fine ( not sure why but where it was stamped over the ink from stenciling it bleed some and the part not over the ink is fine). I adhered a piece of acetate on the backside of the window then made my shaker out of foam tape. I added some Design Creative Bling Just My Luck sequin mix to the shaker then put the back with the clover stamped on it down and pressed all over to seal it. I finished it up my adding sequins and gold cord.


I hope you enjoy these as much as I did creating them. Next on our line up is Jasmine. You won't want to miss what she has created so click the next button and it will take you there.


2. Deana Benson- You are Here!
5. Emma Hall 
6. Lisa
7. Linda
8. Sue T.
9.Kim
10. Noe

TO ENTER:
There are several ways to enter and the more comments you make in the different social media outlets, the more entries you earn! It is required that you comment on each blog in the Hop.  After that, you are encouraged to like, and comment on our Facebook page, tag on our Instagram post and pin on Pinterest, as well as share on your own pages. The participant with the most entries wins the fabulous prize package! How cool is that!?!

Saturday, December 12, 2015

MFT Sketch Challenge 258


I haven't participated in an MFT sketch challenge in the last few months and I really missed it. It's been a very busy time between a death , work, surgery that I'm recuperating from and the general extra things that are thrown in there I just haven't had time. So with the fact that I'm recuperating I'm trying my best to be able to create cards and had some time to participate in the latest challenge.


On with my card! Prior to my surgery I had colored some images not knowing if I would be able to color afterwards for a while. One of the sets that I colored was MFT Santa's elves by Birdie Brown. I had also recently purchased some Bazzill Basic Paper called Holiday Style Classic Christmas and decided that I wanted to use the striped paper in that selection. I didn't have the Die-namic that cuts the stitch rectangle with the one rounded corner. So my solution was to use the stitch rectangle from Blueprints 25 and after cutting that laying the rounded corner rectangle from Blueprints 26 over top of it and only cutting the one corner. Next I used my pinked edge circle and cut a piece of Wild Cherry MFT cardstock. The top layer was a piece of Gumdrop Green MFT cardstock cut using the MFT stitched Circle frame. As I looked at this I decided instead of cutting a rectangle to go below these pieces I wanted to make a rectangular shaker card area so I used the rounded rectangle from blueprints 6 and cut the striped basil paper and I also cut two pieces of fun foam to create my shaker area. Then I got a piece of acetate that was a little larger than the opening and stamped my sentiment and Versa Mark then heat embossed it in black detail embossing powder by Stamp N Stuff. I had a hard time deciding what I wanted to back my shaker with and ended up going with a piece of MFT Blue Raspberry which picks up the blue stripe in the paper. I put my shaker together and used Design Creative Bling's sequin mix called O'Tannenbaum. Which is available at Laura's Loft!


 After assembling my shaker high attached all my elements to the front and added some glossy accents to the ornaments and the bells on the elves hats. My finish card front was mounted to a piece of Neenah solar white 110 lbs card stock as my base.


I had just created my own stamp, which I tried out on this card, to stamp the back of my cards with using my Silhouette Mint and I really like how it works you can create what you want to personalize your stamp and it's so easy.


I hoping everybody is having a good time getting ready for the holidays. Hope to participate in the color challenge and the upcoming sketch challenges. Until next time....


Wednesday, September 23, 2015

Come Hop With Laura's Loft


GIVEAWAY WINNERS WILL BE ANNOUNCED ON www.lauralscott.com/winners Sept. 30th at 12pm

Today I am hopping with Laura for the Grand Opening of her shop and first Blog Hop. We have some wonderful talent gathered here today and I'm sure you will love what they have created. If you arrived here from Laura's Blog I know you enjoyed her beautiful creations. If you missed Laura's stop then click the previous button and check her out.

Laura is also having a Giveaway in celebration of her Grand Opening details at the bottom!

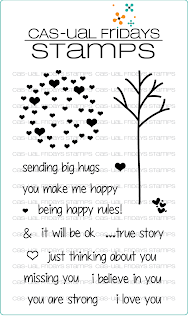
I'm featuring one of CAS-UAL FRIDAYS stamp sets which can be purchased through Laura's Loft. This is the first time I have made a card and had it planned out before I started, usually I don't have a clue which direction my mind will go. I wanted my card to depict the tree having a glow of happiness.  I started with a piece of Neenah solar white 80 lbs card stock cut 4" x 5 1/4 ". I stamped my first tree in MFT Chocolate Brown die ink and then second generation stamped the rest slightly higher to give the impression of depth. Then I used a make up sponge wedge and SSS duckling hybrid ink and created a glow of light around my focal tree. I used the same technique for the grass and sky using SSS Lake Shores and Willow. The hearts on the tree are stamped in SSS High Dive, Melon, MFT Orange Fizz and Ranger Distress Festive Berries. Then accented with Glossy Accents. To finish up my card my sentiment is embossed in Ranger Liquid Platinum and mounted on a MFT Gumball Green Base. This is such a fun set with so many possibilities.


 Cas-sual Fridays CALM AND LOVING
Next on the Hop is Melissa. Just click the next button and it will take you to her blog. She has some wonderful creations in store for you so check her out!  
       
 Melissa Nash Oeters


Laura is having a giveaway for her Grand Opening of Laura's Loft!. The Grand Prize is a $30 gift certificate to Laura's Loft to enter you need to follow her blog or subscribe to her mailing list by entering your email, follow her on Instagram and leave a comment you did all.   The Second Prize is a $10 gift certificate to Laura's Loft. To enter you need to follow the Blog Hop and leave a comment at each stop.One lucky winner will randomly be selected for each prize. Good Luck and happy hopping!
First Prize: $30 Gift Certificate to Laura's Loft
To Enter
1. Hoppers must Follow Laura's Blog and/or subscribe to her mailing list.
2. Follow Laura on Instagram
3. Comment on Laura's Blog you did all
Second Prize: $10 Gift Certificate to Laura's Loft
To Enter
Follow the Hop and comment on each of the stops
To choose a winner, Laura will be using Random.org and verify the winner has visited and commented on each of the blogs
Prizes will be drawn on Wednesday the 30th. 
                                                    
       
If you get off track here is the list of hoppers.

2. Deana C. Benson---YOU ARE HERE

Monday, September 7, 2015

Primitive Pumpkin Treat Card

Starting with a piece of 110lb white cardstock I cut it to 5 1/2 ×11 then scored it at 4 1/4. Using MFT'S Primitive Pumpkin  set I created a background on my card base. I used MFT dye ink colors Gumball Green, Kraft, Cranberry Cocktail, and Orange Fizz. Next I used Blueprints 14's square with the one rounded side and cut one from Kraft and another from Cranberry Cocktail. The sentiment and the star garland are embossed with Ranger white ultra fine. To finish the pocket I took the rounded corner of the Cranberry Cocktail piece and folded it down then added some twine and a button. Oh and I almost forgot I stamped some pumpkins in the same ink colors and fussy cut them. I added some to the pocket and in the pocket. Through in some Kit Kats and I was all finished. Thanks for taking time to stop by.
Cranberry Cocktail Prestige Card StockHeavyweight Card Stock KraftKraft Premium Dye Ink PadPremium Dye Ink Pad Gumdrop Green Premium Dye Ink Pad Orange FizzCranberry Cocktail Premium Dye Ink Pad